Configure Nagios 4.4.5 Email Notification Using Gmail

Nagios can be configured to send out alerts on the state of the host or host service being monitored via email. This guide will, therefore, take you through how to Configure Nagios Email Notification using Gmail.

The current state of a service or host being monitored is determined by the status of the service or host which can be OK, WARNING, UP, DOWN, etc. and the type of state the service or host which can hard or soft.

Read more about notification on Nagios notification.

Before you can proceed, install Nagios and add hosts to be monitored.

Configure Nagios Email Notification Using Gmail

Install Required Mail Packages

In this guide, we are going to use Postfix as an outMail Transfer Agent (MTA). Also, by default, Nagios Mail notification is sent using the mail command. Hence, run the command below to install the required packages.

Yum install postfix cyrus-sasl-plain mailx -y

Configure Postfix to Use Gmail Relay

Enable STARTTLS encryption by changing the line smtp_tls_security_level = may to smtp_tls_security_level = encrypt.

sed -i 's/smtp_tls_security_level = may/smtp_tls_security_level =
encrypt/' /etc/postfix/main.cf

If the smtp_tls_security_level option is not set, just insert it;

echo "smtp_tls_security_level = encrypt" >>
/etc/postfix/main.cf

Define the path to CA certificates. The public root certificates are usually found under /etc/pki/tls/certs/ca-bundle.crt on RHEL derivatives and /etc/ssl/certs/ca-certificates.crt on Debian/Ubuntu systems.

echo "smtp_tls_CAfile = /etc/pki/tls/certs/ca-bundle.crt"
>> /etc/postfix/main.cf 

Next, insert the following lines to the Postfix configuration file to define the Gmail relay host and SASL options.

cat >> /etc/postfix/main.cf << EOF
relayhost = [smtp.gmail.com]:587
smtp_sasl_auth_enable = yes
smtp_sasl_password_maps = hash:/etc/postfix/sasl_passwd
smtp_sasl_security_options = noanonymous
EOF

Configure SASL credentials for your Gmail account.

vim /etc/postfix/sasl_passwd

Enter the following content, replacing the userid and password accordingly.

[smtp.gmail.com]:587 userid@gmail.com:password

Generate Postfix lookup table from the /etc/postfix/sasl_passwd file.

postmap /etc/postfix/sasl_passwd

Change ownership and permission to of the /etc/postfix/sasl_passwd to root and read-write only respectively.

chown root:root /etc/postfix/sasl_passwd*
chmod 600 /etc/postfix/sasl_passwd*

Start and enable Postfix

systemctl enable postfix --now

Test the relay;

First, allow less secure apps access to your Gmail account.

After that, try to send a test mail.

echo "Test Postfix Gmail Relay" | mail -s "Postfix Gmail
Relay" userid@gmail.com

You should be able to receive the mail on your inbox. You can also check the mail logs. The log filename may be different for your case.

tail -f /var/log/maillog
Jan 19 15:01:44 dev-server postfix/smtp[5109]: C7E8C3B5AD: to=userid@gmail.com,relay=smtp.gmail.com[74.125.200.109]:587, delay=18, delays=0.04/0.02/16/2.1,dsn=2.0.0, status=sent (250 2.0.0 OK 1571511704 h8sm11800598pfo.64 - gsmtp)
Jan 19 15:01:44 dev-server postfix/qmgr[4574]: C7E8C3B5AD: removed

Create Nagios Contact Object Definition

The first step in configuring is to create a Nagioscontacts group that defines who should be notified on the state of a monitored service or host.

Nagios comes with a default contact group, contacts.cfg, located on the default objects definition configurations directory, /usr/local/nagios/etc/objects.

You can modify the default contacts definition configuration file or create your own.

Verify Nagios Configuration file

/usr/local/nagios/bin/nagios -v /usr/local/nagios/etc/nagios.cfg

If there is no syntax error, restart Nagios service.

systemctl restart nagios

Testing Nagios Mail Alerts Notification

  • To test if mail notification works, first change the IP address of one of the hosts to an IP that is unreachable such that it looks like the host is down.
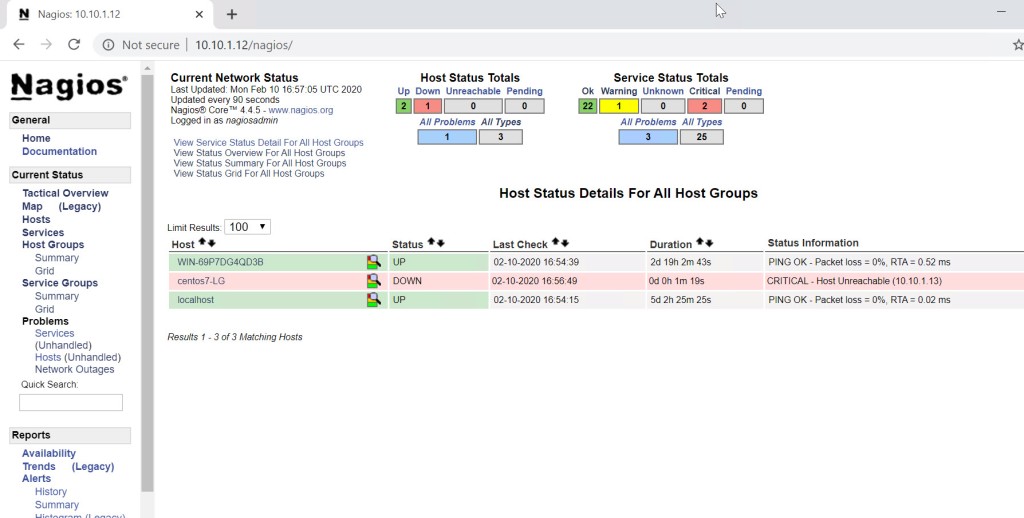
  • Reschedule the next check for the host state. This will automatically send out an email alert on host DOWN.

If you encounter the error below when rescheduling checks,

Error: Could not open command file ‘/usr/local/nagios/var/rw/nagios.cmd’ for update!

This is due to SELinux. To fix, run journactl -xe. It should show some SELinux commands to execute to fix this. The commands below is what i run myself.

ausearch -c 'cmd.cgi' --raw | audit2allow -M my-cmdcgi
semodule -X 300 -i my-cmdcgi.pp

Also, you may encounter the error;

Could not open command file ‘/usr/local/nagios/var/rw/nagios.cmd’

Run the command below to fix it.

chcon -R -t httpd_sys_script_rw_t /usr/local/nagios/var/rw

You should be able to manually reschedule Nagios host or service checks.

You should now get the email alert on the host being down.

Put back the right server IP and reschedule the check to now. You should be able to get the host status UP alert on the mail.

That is just it on how to configure Nagios email notification using Gmail. You should be able to receive alerts for service/host state changes.

Set up Kubernetes Metrics Server and Horizontal Pod Autoscaler on IONOS Enterprise Cloud Kubernetes Clusters.

Create a Kubernetes Metrics Server

1.    To clone the GitHub repository of metrics-server, run the following command:

git clone https://github.com/kubernetes-incubator/metrics-server.git
cd metrics-server/

2.    To install Metrics Server from the root of the Metrics Server directory, run the following command:

kubectl create -f deploy/1.8+/

3.    To confirm that Metrics Server is running, run the following command:

kubectl get pods -n kube-system

The output should look similar to the following:

$ kubectl get pods -n kube-system | grep metrics-server
metrics-server-85cc795fbf-79d72   1/1    
Running   0          22s

Create a php-apache deployment and a service

1.    To create a php-apache deployment, run the following command:

kubectl create deployment php-apache
--image=k8s.gcr.io/hpa-example

2.    To set the CPU requests, run the following command:

kubectl patch deployment php-apache
-p='{"spec":{"template":{"spec":{"containers":[{"name":"hpa-example","resources":{"requests":{"cpu":"200m"}}}]}}}}'

Important: If you don’t set the value for cpu correctly, then the CPU utilization metric for the pod won’t be defined and the HPA can’t scale.

3.    To  expose the deployment as a service, run the following command:

kubectl create service clusterip php-apache
--tcp=80

4.    To create an HPA, run the following command:

kubectl autoscale deployment php-apache
--cpu-percent=50 --min=1 --max=10

5.    To confirm that the HPA was created, run the following command.

kubectl get hpa

6.    To create apod to connect to the deployment that you created earlier, run the following command:

kubectl run --generator=run-pod/v1 -i --tty load-generator --image=busybox /bin/sh

7.    To test a load on the pod in the namespace that you used in step 1, run the following script:

while true; do wget -q -O- http://php-apache; done

Note: To exit the while loop and the tty session of the load generator pod, use CTRL + Cto cancel the loop, and then use CTRL + D to exit the session.

8.    To see how the HPA scales the pod based on CPU utilization metrics, run the following command (preferably from another terminal window):

kubectl get hpa -w

TheMetrics Server is now up and running, and you can use it to get resource-based metrics.

9.    To clean up the resources used for testing the HPA, run the following commands:

kubectl delete hpa,service,deployment php-apache
kubectl delete pod load-generator

A Comparison of Public Cloud Managed Kubernetes Services

In this article, I’ll look to provide some comparisons of public cloud vendors when deciding where to run Kubernetes. Obviously, this assumes that you’ve already decided that Kubernetes is the way to go.
It’s important to understand the main features and capabilities of the main cloud providers and present what I think are some crystal clear criteria for choosing your target platform.

DIY or managed service?
Before I get into public cloud vendors its important to highlight that Kubernetes is so modular, flexible, and extensible that it can be deployed on-prem, or in a third-party data center, in any of the popular cloud providers and even across multiple cloud providers. With a varying array of choices, what should you do for your business and your peace of mind?
The answer, of course, is “it depends.”
Should you run your Kubernetes systems on-prem or in third-party data centers. You may have already invested a lot of time, money, and training in your bespoke infrastructure. The challenges of DIY Kubernetes infrastructure become more and more burdensome as you need to invest time and operational cycles in standing up and ongoing daily management of the environment.

Or should you run your Kubernetes system on one of the cloud providers? You may want to benefit from the goodness of Kubernetes without the headache of having to manage it and keep it in tip-top form with upgrades and security patching.

What’s also important to note is that you’ll need to be already containerized — if you’re already there then great, taking that monolithic application to a brave new world is going to be a challenge but it does bring its benefits as you drive your business forward.

Choosing to run Kubernetes managed by your cloud provider is probably a no-brainer. You already run workloads in the cloud, right? Kubernetes gives you the opportunity to replace a lot of layers of management, monitoring, and security you may have to build and more importantly have the skillset to integrate with your processes and maintain yourself.

There are actually quite a few cloud providers that support Kubernetes and I’ll focus here on the Big Three: Google’s GKE, Microsoft AKS, and Amazon’s EKS and provide a view on what IONOS Enterprise Cloud is offering also.


Google GKE (Google Kubernetes Engine)
Kubernetes, if you didn’t know already, came from Google. GKE is the managed offering of Kubernetes by Google. Google SREs will manage the control plane of Kubernetes for you and you get auto-upgrades. Since Google has so much influence on Kubernetes and it used it as the container orchestration solution of the Google cloud platform from day one, it would be really weird if it didn’t have the best integration.

GKE may be the most up to date on releases. On GKE, you don’t have to pay for the Kubernetes control plane which is important to bear in mind if controlling costs is important to your business, which I assume would be. So with Google, you just pay for the worker nodes. Google also can provide GCR (Goole Container Registry), integrated central logging and monitoring via Stackdriver Logging and Stackdriver Monitoring all be it very pricey, and if you’re interested in even tighter integration with your CI/CD pipeline you can use Google Code Build which will add even more costs, which is all great but as with most PaaS offerings once you get locked in you’re locked in, so the main thing to keep in mind is that flexibility is key with Kubernetes, most ancillary services can be bolted on to your hosted servers so you’re not stove-piped into using the vendors tools if you don’t want to be.

GKE takes advantage of general-purpose Kubernetes concepts like Service and Ingress for fine-grained control over load balancing. If your Kubernetes service is of type LoadBalancer, GKE will expose it to the world via a plain L4 (TCP) load balancer. However, if you create an Ingres object in front of your service then GKE will create an L7 load balancer capable of doing SSL termination for you and even allow gRPC traffic if you annotate it correctly, of course setting up your own Ingress Controller is also possible should the need arise.


Microsoft Azure AKS (Azure Kubernetes Service)
Microsoft Azure originally had a solution called ACS that supported Apache Mesos, Kubernetes, and Docker Swarm. But, in 2017 it introduced AKS as a dedicated Kubernetes hosting service.

AKS is very similar to GKE. It also managed a Kubernetes cluster for you free of charge. Microsoft invested a lot in Kubernetes in general and AKS in particular. There is strong integration with Active Directory for authentication and authorization, integrated monitoring and logging, and Azure storage. You also get built-in container registry, networking, and GPU-enabled nodes.
One of the most interesting features of AKS is its usage of the virtual-kublet project to integrate with ACI (Azure Container Instances). The ACI takes away the need to provision nodes for your cluster.

Setting up a cluster on AKS takes a long time (20 minutes on average) and the startup time has high volatility (more than an hour on rare occasions). The developer experience is relatively poor. You need some combination of a web UI (Azure Portal Manager), PowerShell, and plain CLI to provision and set everything up.


Amazon AWS EKS (Elastic Kubernetes Service)
Amazon was a little late to the Kubernetes scene. It always had its own ECS (Elastic Container Service) container orchestration platform. But, customer demand was for Kubernetes was overwhelming. Many organizations ran their Kubernetes clusters on EC2 using Kops or similar eventually AWS decided to provide proper support with official integrations. EKS today integrates with IAM for identity management, AWS load balancers, networking, and various storage options.

AWS has promised integration with Fargate (similar to AKS + ACI). This will eliminate the need to provision worker nodes and potentially let Kubernetes automatically scale up and down for a truly elastic experience.
Note that on EKS you have to pay for the managed control plane. If you just want to play around and experiment with Kubernetes or have lots of small clusters that might be a limiting factor.

As far as performance goes EKS takes 10–15 minutes to start a cluster. EKS is probably not the simplest to set up as with AKS you’re moving between the management consoles, IAM and CLI to get the cluster up and running, it’s probably the most complex setup out of all the three cloud vendors so in reality, it could take a little under an hour from the initial deployment to getting the cluster up and running.

IONOS Enterprise Cloud
So what about the other vendors, well there are quite a few from the likes of Oracle, IBM and Digital Ocean there is also IONOS Enterprise Cloud. If I was to compare how we IONOS fared against the top three then I would say there is some catch up to make with ancillary PaaS services, but for creating a cluster and providing worker nodes to the cluster then IONOS does this with ease and simplicity actually much better than the competition. IONOS has UI integration with the data center designer which is missing from the top three providers, it’s such a simple process to get up and running that clusters can be ready to use in under 15 minutes.

Having the ability to choose the amount of CPU and RAM is a huge deal, you’re not forced into certain sizes for your worker nodes, adding and removing worker nodes is simple too, just remember to drain your nodes before you remove them. IONOS also has full API ingratiation, in fact, a cluster and worker nodes can be up and running with four API calls. With IONOS you get dedicated CPU and RAM resources so performance is a given. IONOS also brings GDPR compliant cloud infrastructure without having to worry about the US Cloud Act which should be top of your list for cloud service requirements.

There are also services such as persistence volumes in the shape of HDD and SSD storage and load balancer services just like the other vendors, with services on their roadmap to come, also as it’s vanilla Kubernetes, it’s easy to add things like Istio, Prometheus, Grafana and Ingress load balancers too. I’ve not even touched on cost yet but compared to the other vendors IONOS comes under the competition reserved instance pricing too, making it very attractable. Here are some rough figures though to help you determine costs when choosing a Kubernetes platform. This monthly cost comparison assumes that you have 3 master nodes, 15 worker nodes, and each node has 4 vCPU and 16GB of RAM.

AWS Google Cloud Platform Microsoft Azure IONOS
£0.18 per hour £0.18 per hour £0.17 per hour £0.15 per hour
18 Nodes (3 Control) 15 Nodes (Free Control Plane) 15 Nodes (Free Control Plane) 15 Nodes (Free Control Plane)
£2332 Compute Cost £2194 Compute Cost £1836 Compute Cost £1620 Compute Cost
M5 xLarge Instance type: n1-standard-4 D4 v3 4 vcpu 16gb 4 vCPU (2 Dedicated CPU Cores)  16Gb Ram

Conclusion
Kubernetes itself is platform agnostic. In theory, you can easily switch from any cloud platform to another as well as run on your own infrastructure. In practice, when you choose a platform provider you often want to utilize and benefit from their specific services that will require some work to migrate to a different provider or on-prem.

There are a number of container orchestration tools out there with the likes of Rancher, Swarm etc. it looks like Kubernetes has won the container orchestration wars. The big question for you is where you should run it. Usually, the answer is simple. If you’re already running on one of the cloud providers then check to ensure that your vendor is the right choice, this is where multi-cloud is giving you benefit allowing you to leverage the best the cloud has to offer so you can run your Kubernetes cluster with confidence.

Deploying a Managed Kubernetes Cluster in 15 minutes with IONOS Enterprise Cloud

First, log into the IONOS dashboard using your account credentials

If required you can also create a group which can have the relevant privileges for creating and managing the Kubernetes clusters within the account. Select the User manager from the Manager Resources menu on the banner.

A group can be created and the associated privileges applied for creating Kubernetes clusters.

To start creating a Kubernetes cluster select Kubernetes Manager from the Manager resources menu.

Click ‘Create Cluster’

Provide a name for the cluster and click ‘Create Cluster’

The cluster will be created and should take around 3-5 minutes to create.

Once created the status will change to ‘Green’ and then node pools can be created within the cluster, click ‘Create node pool’ to create anode pool.

Provide a name for the node pool

A node pool will be created within a data center and you will be provided with the ability to either create a new data center or select an existing data center.

With a data center selected, provide the number of nodes that should be provisioned along with the CPU Architecture with a number of cores, RAM quantity and other requirements such as Availability Zone, Storage type and Storage size for the nodes.

A validation request is presented, click OK and the node pool will be provisioned.

To view the status of the provisioning of the node pool the expansion arrow can be clicked and more information is displayed, note that the nodes are being provisioned in the background.

Whilst the nodes are being provisioned you can take the opportunity to download the Kubeconfig file which is used via API access to the cluster using kubectl

The status of the node pool will turn ‘green’ once the node pool is in an available state.

The kubeconfig file can be uploaded to your workstation of choice and then administration of the cluster and node pools can begin. In the example below the kubeconfig is exported and some basic checks made to ensure the cluster is in a running state.

This concludes how easy it is to provision a Kubernetes cluster with the IONOS Enterprise Cloud in around 15 minutes.

Using IONOS Enterprise Cloud S3-Compatible Cloud Storage with Veritas Backup Exec

  
Backup Exec 16 Feature Pack 2 provides S3-compatible cloud storage functionality.  Customers can use IONOS S3-compatible cloud implementation with Backup Exec.  When the configuration process is complete, you can create a storage device within the Backup Exec console that can access mostS3-compatible cloud environments.  S3-compatible environments that are not specifically listed in the Backup Exec 16 Hardware Compatibility List are considered AlternativeConfigurations.  The Backup Exec 16 Hardware Compatibility List definesAlternative Configurations as: 

Configuring IONOS S3-Compatible Cloud Storage with Backup Exec

  
Configuring IONOS S3-compatible cloud storage using the S3 Cloud Connector in Backup Exec 16 FP2 is a two-step process: 


 Create a cloud instance for your cloud – requires pre-configuration of a user account and buckets in the cloud environment.  The cloud location and configuration parameters must be provided to the Backup Exec server by configuring a cloud instance using the Backup Exec Command Line Interface (BEMCLI) (see Creating a Cloud Instance for S3 Compatible Cloud).

Create a cloud storage device – in the Backup Exec console by using the storage device configuration wizard and providing the account credentials that can access the S3-compatible cloud location.  

S3 Cloud Pre-Configuration Requirements

  
In the cloud environment, create an account for Backup Exec read/write access.  The cloud account credentials, known as the server access key ID and secret access key, must be provided in the Backup Exec console to create the storage device. 
  
The cloud environment must also have buckets configured for Backup Exec use.  Buckets represent a logical unit of storage in a cloudenvironment.  As a best practice, create specific buckets to useexclusively with Backup Exec.  Each Backup Exec cloud storage device mustuse a different bucket.  Do not use the same bucket for multiple cloudstorage devices even if these devices are configured on different Backup Execservers. 
  
Bucket names must meet the following requirements:

  • Can contain lowercase letters, numbers, and dashes (or hyphens)
  • Cannot begin with a dash (or a hyphen)

  
Bucket names that do not comply with the bucket naming convention will not be displayed in the Backup Exec console during storage device configuration. 
   

Creating a Cloud Instance for IONOS S3-Compatible Cloud


To create a custom cloud instance for an S3-compatible cloud storage server use the BEMCLI command “New-BECloudInstance”.  

  
To run BEMCLI on the computer on which Backup Exec is installed you can either 
 

  • Go the taskbar, click Start > All Programs > Veritas Backup Exec > Backup Exec Management Command Line Interface

or

  • Launch PowerShell, and then type Import-Module BEMCLI.


From the BEMCLI command line interface run the New-BECloudInstance command with the required parameters, for example:
New-BECloudInstance -name “IONOS-Enterprise-Cloud” -Provider”compatible-with-s3″ -ServiceHost”s3-de-central.profitbricks.com” -SslMode “Disabled”-HttpPort 80 -HttpsPort 443
 

Mandatory Parameters:

  • Name: Name of the new cloud instance.  Cloud instance name must match BE naming requirement.
    • Instance names can contain letters, numbers, and dashes (or hyphens).
    • Instance names cannot begin with a dash (or a hypen).
  • Provider: Specifies the provider name of the cloud instance.  For s3 the provider name is ‘compatible-with-s3’.
  • ServiceHost: Specifies the service host of the cloud instance. ServiceHost should be unique for each cloud instance that is created on the Backup Exec server.
  • SslMode:  Specifies the SSL mode that Backup Exec will use for communication with the cloud storage server. The valid values are:
  • Disabled: Do not use SSL.
  • AuthenticationOnly: Use SSL for authentication only.
  • Full: Use SSL for authentication and data transfer also.

  
Note: Backup Exec supports only Certificate Authority (CA)-signed certificates while it communicates with cloud storage in the SSL mode. Ensure that the cloud server has CA-signed certificate. If it does not have the CA-signed certificate, data transfer between Backup Exec and cloud provider mayfail in the SSL mode. Users may choose to opt out of SSL and set SSLMode asDisabled. 
  
To confirm the command completed successfully, run the BEMCLI command“Get-BECloudInstance”.  The parameters of the newly configured cloud instance will be displayed.  Ensure that the ServiceHost points to the correct S3-compatible cloud implementation, the provider name is accurate and the SSL mode is set correctly.  If any parameters are not correct, rerun the New-BECloudInstance command with the corrected parameters. 
 

Creating a Cloud Storage Device forS3-Compatible Cloud

  
To configure a storage device for an S3-compatible cloud in Backup Exec:


1. On the Storage tab, in the Configure group, click Configure Cloud Storage

2. Click Cloud storage, and then click Next

3. Enter a name and description for the cloud storage device, and then click Next

4. From the list of cloud storage providers, select S3, and then click Next

5. From the Cloud Storage drop-down, select the name of the instance created with BEMCLI 

6. Click Add/Edit next to the Logon account field. 

7. On the Logon Account Selection dialog box, click Add

8. On the Add Logon Credentials dialog box, do the following:

  • In the User name field, type the cloud account access key ID.
  • In the Password field, type the cloud account secret access key.
  • In the Confirm password field, type the cloud account secret access key again.
  • In the Account name field, type a name for this logon account.

                The Backup Exec user interface displays this name as the cloud storage device name in all storage device options lists.

9. Click OK twice. 

10. Select the cloud logon account that you created in step 8, and then click Next

11. Select a bucket from the list of buckets that are associated with the server name and the logon account details you provided in earlier screens, and then click Next

12. Specify how many write operations can run at the same time on this cloud storage device, and then click Next

13. This setting determines the number of jobs that can run at the same time on this device. The suitable value for this setting may vary depending on your environment and the bandwidth to the cloud storage. You may choose the default value. 

14. Review the configuration summary, and then click Finish. Backup Exec creates a cloud storage device. You must restart Backup Exec services to bring the new device online. 

15. In the window that prompts you to restart the Backup Exec services, click Yes. After services restart, Backup Exec displays the new cloud storage location in the All Storage list. If the S3-compatible cloud environment is not displayed in the Backup Exec storage device configuration wizard or console, use BEMCLI to ensure the parameters for the cloud instance are correct.

Once the S3-compatible cloud storage device is configured in Backup Exec, you can target backup, restore and duplicate jobs to the cloud server.  As a best practice, test backup and restore operations should be completed before running regularly scheduled jobs. Backup Exec Data lifecycle management will automatically delete expired sets from the cloud server.

IONOS Enterprise Cloud – Data Center Designer – Introduction

With the Enterprise Cloud, you receive a modern IaaS platform for cloud computing—highly available, secure, reliable, and with fast software defined networking. This means you receive precisely the virtual IT infrastructure that your company actually needs. The drag and drop feature in our Data Centre Designer allows you to put together the resources for your customised virtual data centre, without any rigid, prefab packages.

Our live vertical scaling gives you the option of flexibly adding new capacities and components to your virtual infrastructure – at any time, on short notice, and without rebooting the system! This is what makes the Enterprise Cloud by 1&1 IONOS one of the most attractive corporate cloud solutions available anywhere on the market.

How to Install and Configure WordPress on CentOS 7

Introduction

WordPress is a free and open source blogging platform or content management system based on PHP and MySQL. Currently WordPress is the most popular CMS all over the world, and has 20000 plus plugins to extend its functionality.You can easily create a simple website, blog or complex portals and enterprise websites using WordPress.

WordPress provides lots of features. Some of them are listed below:

  • WordPress is available in more than 70 languages. So you can build a website in a language as your choice.
  • You can easily manage your content, schedule, look and publication using WordPress, and also secure your posts and content with a password.
  • WordPress comes with thousands of themes for you to create a beautiful website. You can also upload your own theme with the click of a button.
  • With the importers feature you can easily import your blog from another website to WordPress.
  • WordPress provides search engine optimization out of the box, and also provides many SEO plugins.

In this tutorial, we will discuss how to install and configure WordPress on a CentOS 7 server.

Requirements

  • A server running CentOS 7.
  • A non-root user with sudo privilege setup on your server.

Getting Started

Update your system with the latest package versions by running the following command:

sudo yum update -y

Once your system is up-to-date, you can proceed to the next step.

Installing LAMP

Before installing WordPress itself, you will need to install the LAMP stack and other required packages on your server.

You can install all the necessary packages with the following command:

sudo yum install httpd mariadb mariadb-server php php-common php-mysql php-gd php-xml php-mbstring php-mcrypt php-xmlrpc unzip wget -y

Once installation is complete, start the Apache and MariaDB services and enable them to start at boot with the following commands:

sudo systemctl start httpd
sudo systemctl start mariadb
sudo systemctl enable httpd
sudo systemctl enable mariadb

Configuring MariaDB for WordPress

By default MariaDB is not secured, so you will need to secure it first. You can do this by running mysql_secure_installation script:

sudo mysql_secure_installation

Answer all the questions as shown below:

Set root password? [Y/n] n
Remove anonymous users? [Y/n] y
Disallow root login remotely? [Y/n] y
Remove test database and access to it? [Y/n] y
Reload privilege tables now? [Y/n] y

Once you have finished, login to MariaDB console with the following command:

mysql -u root -p

Enter your MariaDB root password and hit Enter. After login, create a database for WordPress:

MariaDB [(none)]>CREATE DATABASE wordpress;
MariaDB [(none)]>GRANT ALL PRIVILEGES on wordpress.* to 'user'@'localhost' identified by 'password';
MariaDB [(none)]>FLUSH PRIVILEGES;
MariaDB [(none)]>exit

Installing and Configuring WordPress

You can download the latest version of the WordPress source from the official website. You can get the latest version of WordPress by running the following command:

wget http://wordpress.org/latest.tar.gz

Once download is finished, extract the downloaded file with the following command:

tar -xzvf latest.tar.gz

Next, move the extracted files to the Apache web root directory:

sudo cp -avr wordpress/* /var/www/html/
restorecon -r /var/www/html

Next, create a directory for WordPress to store uploaded files:

sudo mkdir /var/www/html/wp-content/uploads

Next, assign proper ownership and permissions to your WordPress files and folders:

sudo chown -R apache:apache /var/www/html/
sudo chmod -R 755 /var/www/html/

Next, you will need to make some changes in the WordPress main configuration file, so it can be connected with the database and user.

First, rename and edit the WordPress main configuration file:

cd /var/www/html/
sudo mv wp-config-sample.php wp-config.php
sudo nano wp-config.php

Change the DB_NAME, DB_USER, and DB_PASSWORD variables as shown below:

define('DB_NAME', 'wordpress');
define('DB_USER', 'user');
define('DB_PASSWORD', 'password');

Save and close the file when you are finished.

Accessing WordPress Web Installation Wizard

Before starting, you will need to allow access to the Apache ports using firewalld.

You can do this by running the following command:

sudo firewall-cmd --permanent --zone=public --add-service=http
sudo firewall-cmd --permanent --zone=public --add-service=https
sudo firewall-cmd --reload

Next, open your web browser and type the URL http://your-server-ip. You should see the following page:

WordPress language selection

Select language as per your need and click on Continue button, you should see the following page:

WordPress site info page

Fill out all the required site information and click on Install WordPress button. You should see the WordPress default dashboard as below:

WordPress dashboard page

Once installation is completed, you can login WordPress by typing the URL http://your-server-ip/wp-login.php? on your web browser. You should see the WordPress login page as below:

WordPress login page

Next, provide username and the password which you have created earlier and click on Log In button, you should see the following page:

WordPress dashboard

Summary

Congratulations! You have successfully installed WordPress on CentOS 7. I hope you have now enough knowledge to host your own WordPress blog easily. Feel free to comment below if you have any questions.

Avoiding Cloud Vendor Lock-in

Always ask before entering into any contract, “How do I get my data out in the future if I need or want to?”

Cloud vendor lock-in is typically a situation which a customer using a product or service cannot easily transition to a competitor. Lock-ins are usually the result of proprietary technologies that are incompatible with those of its competitors and it can also be caused by inefficient processes or constraints among other things.  I’ve seen many customers come up against this in the past with traditional data centers where their storage vendor or hyper-visor solutions locked those customers into fixed solutions which inhibit the customer to be agile in moving to new technologies. The cloud albeit public or private can be no different when it comes to using lock-in techniques for retaining its user base.

Fear of Lock-in

Cloud lock-in is often cited as the major obstacle to cloud service adoption. there are a number of reasons why a company may look to migrate to the cloud, most often its all about reducing the physical infrastructure that they have in their data centers, cloud gives them the agility their look for, additionally reducing not only the CAPEX but also the OPEX required for the ongoing maintenance of the systems.

There’s also the question of how they should migrate to the cloud , the complexities of the migration process may mean that the customer stays with their provider which could also mean there’s a compromise in that their current provider doesn’t meet all their needs and limits the agility of their IT and value it provides to the business. 

In some cases during the migration to another provider it may be required to move the data and services back to the original on-premises location which in itself may be an issue as the original architecture may no longer be available or the data center is now reduced in resource availability and prohibits such an action. Further more the data may of been changed to allow its operation on a particular cloud vendors platform and would need to be altered again to run on an alternative cloud platform. 

Cloud vendor lock-in

Its only natural that cloud vendors want to lock you in after all they’re there to make money and need you to stay with them, they work at ways to keep you using their services and try to ensure that migrations are not an easy task. their customers often don’t know the impact until they try to migrate and can be devastating when it happens. Due to these challenges migration services from third party vendors are becoming a common occurrence and turning into lucrative business.

Taking the leap

Most companies I’ve talked to recently have similar experiences when looking to migrate from their current cloud vendors, the majority were unhappy with the perceived costs of using cloud infrastructure after all cloud was suppose to be cheap but the ROI was taking longer than first anticipated. The cloud vendors support services were a close second due to the lack of any personal experience offered from their vendor, i guess there’s only a number of times that “Take a look at this FAQ” is going to help.

One of the other major problem with cloud vendors is that you typically need to over allocate already inflated resources to the services you are providing as cloud resources are most of the time shared with other users of their services. its a bit like a house share, the last thing you need is someone hogging the bathroom.

PaaS services were also another reason, whilst PaaS is great in reducing the OPEX of the underlying infrastructure and application or database services it does start to get expensive with large number of API gateway calls which if unplanned for can be a bit of a surprise when you get your invoice, add to that one clouds PaaS may not be inter-operable with another so some type of data cleaning is going to be needed.

GDPR (there I’ve said it) was another reason which raised its head especially if the vendor was US based then the C.L.O.U.D. Act comes into effect.

https://docs.house.gov/billsthisweek/20180319/BILLS-115SAHR1625-RCP115-66.pdf#page=2201

If your using a US based provider then your data is no longer private as is can be handed over to the US government if they deem any suspect need to, oh and hosting in a different region outside of the US doesn’t help either so using a Irish region will not allow you to escape the act. The last time I check the big 3 public clouds are all US owned but if you believe that this may not effect you then you don’t need to look too far to see it in action, I’m sure we all remember Cambridge Analytica and the Facebook debacle that company had to hand over its data and now no longer exists! Taking up a hybrid cloud approach and using a dedicated European provider with multiple region support will help avoid this.   

One company that I spoke to had a concerning case in that their cloud vendor had no export facility for the data and had challenges on how to cleanly extract the data, this challenge was compounded even more as the tax man also called in an audit on their accounts during the migration phase and had to take a hit on a penalty as the accounts were not available at the time of the audit. The whole process was painful and time consuming and they surely learnt a lot from the experience.

And the moral of the story is …..

Ask the important questions, “How is the data securely stored?”, “Who has access to my data”, “How is my data protected?”, “Do I need to modify my data so the cloud vendor can store it?” and most importantly “How do I get my data out in the future if I need and want to?” In most cases getting your data out is going to cost you but knowing that’s its possible is half the battle. if your new provider has tools to make it easier for you then that’s even better.

And lastly

Be aware of the existence of the CLOUD Act and its potential implications for your business.
Adopt a hybrid cloud strategy, which clearly defines which data can be stored in public cloud services, and what should be stored in data centers operated by European managed service operators.
If you have large amounts of customer data, and would like to alert them if you do get a request to hand over personal data under the CLOUD Act, you might want to consider adding a warrant canary clause on your website.

Comparing Public Cloud Performance – Part Three – GCP

In the first series on this post I looked at Azure VMs and provided a comparison with IONOS Enterprise Cloud, in the second part we looked at AWS, this final post of the series will look at comparing Google Cloud Platform (GCP).

As a bit of background in case you haven’t read the first or second parts yet, I’ve been working with the major cloud vendors for some years now and for me performance has always been a key factor when choosing the right platform, I’ve always struggled in finding the right balance of cost vs performance when choosing the right platforms and have created this blog to highlight some of the differences.

I’ve just started a new role as Cloud Architect for 1&1 IONOS Enterprise cloud and one of the main factors in coming here was the technology and some of the claims that it makes especially with performance and simplicity. This blog will highlight those performance claims and also the cost benefit that choosing the right cloud provider will be for you.

For these tests I’ve kept it simple, I’m using small instances that will host microservices so cost is one variable but performance is another, I will be creating an instance with 1 vCPU and 2Gb RAM, this system will be a base line for testing and I will use Novabench (novabench.co.uk) for some basic CPU and RAM performance modelling. There are so many tools out there but I find this one real quick and simple to test against some key attributes I will also be using the same tool for the instances so not unbiased results too.

So on with the comparison and next up is GCP for this I’ve selected a custom VM size as this is as near as consistent with other instances on the clouds I have been testing, The CPU used is an Intel Xeon 2.3Ghz and the price for this including windows server licensing and support costs comes out at £50.64 per month


GCP Pricing calculator for Custom VM

For IONOS Enterprise Cloud I’ve also selected a similar spec as GCP which is a 1 CPU and 2Gb RAM and have used the Intel Haswell E5-2660v3 based chip for the OS as this will be as close to the custom VM in GCP, Like GCP I’ve also included the Windows Server license cost in the subscription along with 24/7 support which is actually free. The monthly cost for this server is £59.18 so comparing costs of using IONOS Enterprise Cloud there is a slight benefit of using GCP as you would save £102.48 over the year, so looks like GCP has a cost edge over IONOS, so what about the performance.


IONOS Enterprise Cloud Pricing for GCP 1 CPU 2Gb RAM equivalent

First I wanted to see how the external and internal internet connectivity was performing, to no big surprise IONOS way out performed Azure by a factor of 2, which is to be expected given the infrastructure back end design running on InfiniBand and the datacentre interconnects. The download speed was comparable for Google which you would expect from the internet giant.

GCP Speedtest performance rating

IONOS Enterprise Cloud Speedtest performance rating

Next the focus turned to CPU, RAM and disk performance for this I ran the Novabench performance utility and performed tests on both servers, the tests did throw up some major differences between the two. Let’s take a look at GCP first

GCP custom 1 vCPU & 2GB Ram VM Novabench Results

The GCP results were interesting to a point that twice as much resources are to be required to get to the same level of the IONOS instance.The GCP instance had a more or less half that of a score for its CPU, RAM and Disk benchmark compared to IONOS but it must be noted that the GCP resources are shared resources instances being hosted on GCP, the RAM score was also at a much lower throughput with a difference of 11964 MB/s, but what was noticeable was that the disk read and write performance was half that of IONOS. the write speed was not what would be expected from SSD storage.

The IONOS Enterprise cloud exhibited near twice the values from the results to GCP.

IONOS Instance Novabench result

Conclusion

Due to the dedicated resources that are used by IONOS Enterprise Cloud it becomes apparent that other Public Cloud vendors have to double (GCP & AWS) or even quadruple (Azure) their resource configurations to be comparable in performance to IONOS. Comparing GCP to IONOS to catch up to a similar performance of that of IONOS Enterprise Cloud the GCP instance would need to be reconfigured to a custom VM with 2 vCPUs and 4Gb RAM size this is 2 times the resources of the IONOS Instance which would increase the monthly cost to £94.57 which would equate to £1134.84 for the year of which you would have to pay an extra £423.96 per year for an equal performance instance of that of the IONOS instance.

GCP custom 2 vCPU& 4GB Ram VM Novabench Results

Can you really justify that type of expense of spending an additional £400 per year for just one system for the same performance? IONOS Enterprise Cloud provides dedicated CPU and Memory and is surely the way to go.

Don’t just take my word for it, give it a go yourself, I’m sure you’ll be impressed with the results.

Get your free 30 day no obligation trial at https://www.ionos.co.uk/pro/enterprise-cloud/

Nagios Core Upgrade on CentOS 7

We are going to upgrade Nagios Core from 4.1.1 to 4.4.2.

Backup Existing Nagios Configuration
Nagios and Apache services should be stopped:

systemctl stop nagios httpd

Make sure that we have a backup:

rsync -rav /usr/local/nagios/ /opt/nagios411backup/

Upgade and Configuration
Download Nagios Core release 4.3.4 and extract the archive:

wget https://assets.nagios.com/downloads/nagioscore/releases/nagios-4.4.2.tar.gz
tar xf ./nagios-4.4.2.tar.gz && cd ./nagios-4.4.2

Configure and compile:

./configure --with-command-group=nagcmd
make all

Install the main program, CGIs, HTML files, sample config files etc:

make install
make install-init
make install-commandmode
make install-config
make install-webconf
make install-webconfig

Restore the configuration file nagios.cfg from the backup:

cp -f /opt/nagios411backup/etc/nagios.cfg /usr/local/nagios/etc/

Restore the password file htpasswd.users if required:

cp -f /opt/nagios411backup/etc/htpasswd.users /usr/local/nagios/etc/

Restore objects:

rsync -rav /opt/nagios411backup/etc/objects/ /usr/local/nagios/etc/objects/

In our case we also want to restore all custom monitoring configuration files:


rsync -rav /opt/nagios411backup/etc/monitoring/ /usr/local/nagios/etc/monitoring/

These are deprecated and will be removed in future versions, might as well change them now:

sed -i 's/normal_check_interval/check_interval/g' /usr/local/nagios/etc/objects/templates.cfg
sed -i 's/normal_check_interval/check_interval/g' /usr/local/nagios/etc/objects/printer.cfg
sed -i 's/normal_check_interval/check_interval/g' /usr/local/nagios/etc/objects/switch.cfg
sed -i 's/retry_check_interval/retry_interval/g' /usr/local/nagios/etc/objects/templates.cfg
sed -i 's/retry_check_interval/retry_interval/g' /usr/local/nagios/etc/objects/printer.cfg
sed -i 's/retry_check_interval/retry_interval/g' /usr/local/nagios/etc/objects/switch.cfg
sed -i 's/^command_check_interval/#command_check_intervald/g' /usr/local/nagios/etc/nagios.cfg

We use Nagiosgraph, therefore we need this to continue processing data (the config file which we restored from the backup does contain the line already, therefore it’s mainly for future references).

sed -i 's/process_performance_data=0/process_performance_data=1/g' /usr/local/nagios/etc/nagios.cfg

Reload and restart the services:

systemctl daemon-reload
systemctl restart nagios
systemctl restart httpd

Verify:

/usr/local/nagios/bin/nagios -v /usr/local/nagios/etc/nagios.cfg

Nagios Core 4.4.2
Copyright (c) 2009-present Nagios Core Development Team and Community Contributors
Copyright (c) 1999-2009 Ethan Galstad
Last Modified: 2017-08-24
License: GPL

Website: https://www.nagios.org
Reading configuration data…
Read main config file okay…
Read object config files okay…

Running pre-flight check on configuration data…

Checking objects…
Checked 1671 services.
Checked 190 hosts.
Checked 44 host groups.
Checked 47 service groups.
Checked 5 contacts.
Checked 6 contact groups.
Checked 126 commands.
Checked 7 time periods.
Checked 0 host escalations.
Checked 0 service escalations.
Checking for circular paths…
Checked 190 hosts
Checked 0 service dependencies
Checked 0 host dependencies
Checked 7 timeperiods
Checking global event handlers…
Checking obsessive compulsive processor commands…
Checking misc settings…

Total Warnings: 0
Total Errors: 0

Things look okay – No serious problems were detected during the pre-flight check
If there are any configuration mismatches between the old and the new Nagios versions that affect your set up, then change them accordingly.